Hello, Sign In | Register
Place an Order | Price Calculator | Business Book Printing | eBooks | Blog | Contact Us
48 Hour Books Logo  
48 Hour Books Logo
Sign In | Register
Place an Order Price Calculator Business Book Printing Book Printing
Book Printing Pricing Calculator Book Binding Hardcover Book Printing Paperback Book Printing Printed Proofs eBooks Shipping Schedule Pre-Press and Production Schedules
Book Design
Book Design Book Formatting Covers Paper Types
Self Publishing
Self Publishing Book Templates Book Publishing Process Reordering Printed Books The Ordering Process Editing Resources How to Make a Book ISBN & Barcode Genres
Publishing Resources
Publishing Resources Self-Publishing Checklist Ultimate Guide to Self-Publishing Marketing Resources How to Format a Book Video Gallery
Support
Support Frequently Asked Questions Proofreading Instructions COVID-19 How We're Different Our Blog Contact Us
Contact Us

Book Publishing FAQ

When you’re learning how to print a book, it may seem like there’s a lot of information! We’ve compiled a list of frequently asked questions about custom book printing so that you can find the answers you’re looking for. We’re here to help you learn everything you need to know about printing, publishing, file setup, costs, and more.

Remember, we print your files according to your instructions -- so always take the time to check that everything is exactly the way you want it before you release your book to be printed. There are additional costs for sending revised files or requesting changes, so a second look will save you time and money, too.

We'll always send you PDF proofs to approve before we will begin printing (unless it's an exact reprint of a previous order). Review our Proofreading Instructions for specific items you should be sure to double check before approving your proofs.


Need more support?

Not finding the answer to your question? Reach out to our exceptional customer support team. Call us at 800-231-0521 or contact us online.


Yes, we do! Simply click this link to request a copy of our book, "The Ultimate Guide to a 48 Hour Book". We'll send you a complete book, printed and bound, that shows you samples of our printing quality, our paper options, and a few of our premium cover options. It also gives you lots of useful information, so you'll have plenty of help setting up your files, and choosing the options that are right for you. Of course, you can also download a PDF of the book. You'll still get all of the great info, but it's just a PDF, so you won't be able to see and feel our paper samples, printing and binding, and our foil stamping or Diamond 3D.

Yes, we do. You can download templates for free from our Templates Page. We currently have templates for your inside pages, which can be used in Microsoft Word, Word Perfect, Open Office, Pages, and just about any other popular word processing program. We'll be adding Cover Templates for InDesign soon.

In Windows, using Word 2007 or newer: Many of our clients use Microsoft Word to write their books. If you're using a recent version of Word (2007 or newer), the easiest way to create a PDF file is to click "File > Save As ..." and select "PDF File" as your file type. Click on the "Options" button, and check the box that says something like "ISO 19005-1 compliant (PDF/A)". This should embed all fonts. Double-check by opening the PDF file, select File > Properties, click on the 'Fonts' tab, and make sure each font listed says "Embedded" or "Embedded Subset" after its name. If any fonts don't say that, they weren't embedded. It may be that you don't have permission to embed them. They may still print OK, so send the PDF to us, and we'll check it for you.

In Windows, using an older version of Word or a different program: You can convert your files to PDF for FREE by using a great new converter called doPDF. Simply click here to download doPDF and select "Run" when prompted. This installs a virtual printer named "doPDF" on your computer. With it, you'll be able to "File > Print ..." to create a PDF from any Windows application. Then choose "doPDF" as your printer. The first time you use doPDF, hit the 'Preferences' button and change 'Graphic Resolution' to 600 dpi (near the bottom right of the window.) Hit 'OK' and your Preferences are all set. Hit 'Print', make sure 'Embed fonts' is turned ON, and it will create a PDF.

From a Mac: PDF conversion is built right into your system. To create a PDF file on a Mac, simply open your file, select "File > Print", then click the "PDF" button at the bottom left and choose "Save as PDF ...".

Be sure to check your PDF file CAREFULLY before sending it to us for printing. Any errors on your PDF will show up on all of your books. If you have questions, call us for help, or just send us your Word files and we'll convert them for you for a $50 charge.

It's easiest to use our new Cover Size Calculators

Simply click the appropriate button (Perfect Bound (paperback) books on the left, and Hard Cover books on the right.) A .zip file containing the Calculator will be downloaded to your computer. If it doesn't open automatically in Acrobat, double-click the .zip file, which is probably in your "Downloads" folder. This is a PDF form, so it will only work in Acrobat. If you use a different program to view PDFs, the calculator won't work. But don't worry, you can simply call us and give us your dimensions, and we'll give you the proper size for your cover.
Perfect Bound Cover Size Calculator          Perfect Bound Cover Size Calculator


If you don't want to use our calculators above, here are basic instructions that work for Perfect Bound book covers:
Make your cover slightly larger than the book itself, to account for bleed (when the printing goes all the way to the edge). Since it's a wrap-around cover, it needs to be TWICE the width of the finished book, plus the spine. To determine the width of your spine, divide number of Pages (not SHEETS, but PAGES) by 440. For example, if your book was 120 pages, the spine would be 120 / 440 = 0.27 inches.

So, for a 5.5 x 8.5 book that is 120 pages long, the cover should be 8.5 tall, and 11.27 wide (5.5 front + 5.5 back + .27 spine = 11.27). And for a 8.5 x 11 book that is 200 pages long, the cover should be 11 tall, and 17.45 wide (8.5 front + 8.5 back + .45 spine = 17.45). Of course, if your artwork is going to BLEED (go all the way to the edge), you'll need to have it extend 1/8" BEYOND the edges on top, bottom and sides. Include your title and author name on the spine so when your book is on a bookshelf, the title and author name read from top to bottom.

For Coil Bound books or Saddle-Stitched booklets, since there is no spine, simply send us a front cover and a back cover, the same size as your book pages. Remember to include a 1/8" bleed if your artwork is intended to bleed off the edges.

Please Note: We do NOT print on the inside cover. No printing on the inside front cover or back cover. Under special circumstances, we can print on the inside cover, but there is an additional cost and time involved. Please call to discuss.

Microsoft Word...

To change your book size in Microsoft Word, click the Page Layout header. From here, either select the proper size from the list or simply type in the proper width and height. Next, type the proper margins. We recommend 0.75" of margin on all four sides. This ensures that none of the text runs too close to the edge of your final book.

Microsoft Publisher

After opening Microsoft Publisher, select the "Blank Page Sizes" option and choose the size that you would like your finished book to be. Next, on the left-hand column, select "Change Paper Size ...". From here, you can adjust the page size as well as the margin guides. We recommend 0.75" of margin on all four sides. This ensures that none of the text runs too close to the edge of your final book.

InDesign...

To change your book size in InDesign, select "File > Document Setup ..." and adjust the width and height to be the size that you would like your finished book to be. Next, select "Layout > Margins and Columns ..." and adjust your page margins. We recommend 0.75" of margin on all four sides. This ensures that none of the text runs too close to the edge of your final book.

You upload your files AFTER you place your order. We walk you through a very easy upload process, and your files will be connected to your order. Many of our clients have multiple titles on order at the same time, so this way they can upload files to the correct order, so there won't be any confusion.
Here's a short video that gives you a quick overview of how easy it is to place an order.

Our minimum is 10 books. We don't have a maximum quantity, we can print tens of thousands if you'd like.

If you order more than 500 books, we may not be able to finish ALL of your books by the deadline, but we'll always ship at least 500 on your ship date, with additional books shipping out at least 500 per day thereafter. So if your order is time-sensitive, you'll be assured to at least have 500 books shipping out quickly.

The self-publishing process is easier when you know all the steps. First, you’ll need to make sure your book receives a thorough editing. Design and format your book to be printed -- you can get help with this stage if you need it. Reserve your ISBN and barcodes so you can sell your published book, and be sure to convert a copy to eBook format, too. Finally, place an order to print your book -- 48 Hour Books makes this process extremely fast!

Learn more about self-publishing your book.

Yes. As long as you order a minimum of 10 books of each binding type, we offer the option to "convert" some books on a single order to a different binding type.

You may decide you want a few "special edition" copies of your book. Select the option to convert 25 of your books to hard cover, and we'll do just that! We will use the same artwork for both binding types (with minor adjustments to the size of the covers, since hard covers are slightly larger). Your total quantity of books won't change - for example:

  • Order 50 perfect bound books and convert 25 to hard cover. You will receive 25 perfect bound books and 25 hard cover books.
  • Order 100 (+25 free) perfect bound books and convert 25 to hard cover. You'll receive 100 perfect bound books and 25 hard cover books.

Our special discounted cost of $210 is for converting 25 books to hard cover, but you can convert as few as 10 or as many as you'd like for $10 per book. For example:

  • Order 100 (+25 free) perfect bound books and convert 10 of those to hard cover. The additional cost would be $100, and you'd receive 115 perfect bound books and 10 hard cover books.
  • Order 200 (+25 free) perfect bound books and convert 100 of those to hard cover. The additional cost would be $1,000, and you'd receive 125 perfect bound books and 100 hard cover books.

Let our customer service team know how many books you'd like converted to hard cover and they will adjust your order details and total after the order is placed. There is a minimum of 10 books per binding type.

If you'd like additional options or if you require different interior pages for each binding type, you must place two separate orders for the different binding types. Call us if you have any questions!

Please note: hard cover books have a standard production time of 5 business days.

Your perfect bound books will be completed first, and shipped as soon as they are ready. Your hard cover books will arrive later in a separate shipment.

Yes, you do! As long as you order 100 or more, we'll print 25 additional books for free.

Example: Order 100 books, and you'll receive 125 books! Order 200 books, and you'll receive 225 books!

Yes, we do! Your book doesn't have to have an ISBN, but if you're planning on selling it through major bookstores or online bookstores, you'll need one.

At 48 Hour Books, we bundle the ISBN with a barcode to save you money. Just download our ISBN Application Form (USA), fill it out, and email it back to us. (This is only for the United States and its territories. Canadian customers should get their ISBN through CollectionsCanada). A single ISBN & barcode is $125, a block of 10 ISBNs & barcodes is $450 ($45 each), a block of 100 ISBNs & barcodes is $2,000 ($20 each), and a block of 1,000 ISBNs & barcodes is $4,000 (just $4 each).

Be sure to order your ISBN before we set up your cover artwork, and don't approve your cover artwork if your barcode isn't on it. The ISBN process only takes a couple of hours, so in most cases it shouldn't effect your deadline. But if it does, we can always print your books without a barcode, and print barcode stickers that you can put on the books after you get your ISBN.

Please Note: All purchases of ISBNs are FINAL. Once an ISBN has been purchased, it cannot be returned. There are no refunds available for ISBNs.

Yes, if you already have an ISBN, we can create the barcode for you. We can also include the price for the book in the barcode if you'd like us to. Simply type the ISBN number and the price in the "Comments" section when you place your order. It costs $20, which we will add to your order.

We're the only book printers who can provide self publishers with Foil Stamped covers.
The cost of Foil Stamping is based on the size of the area to be foil stamped: Small, Medium, Large or Extra Large.
A typical 5.5 x 8.5 or 6 x 9 book might use SMALL or MEDIUM.
A typical 8.5 x 11 book might use MEDIUM or LARGE.
The EXTRA LARGE size is only if your foil stamping or embossing is on both the front cover AND the back cover, which is very rare.

Foil Stamping - no embossing
Set-Up 
Cost per Book 
SMALL - Die up to 27 square inches $250 set-up + 35¢ per book
MEDIUM - Die between 27 and 54 square inches $300 set-up + 40¢ per book
LARGE - Die between 54 and 81 square inches $350 set-up + 50¢ per book
EXTRA LARGE - Die larger than 81 square inches $600 set-up + 75¢ per book


Blind Embossing - no foil
Set-Up 
Cost per Book 
SMALL - Die up to 27 square inches $300 set-up + 35¢ per book
MEDIUM - Die between 27 and 54 square inches $375 set-up + 40¢ per book
LARGE - Die between 54 and 81 square inches $450 set-up + 50¢ per book
EXTRA LARGE - Die larger than 81 square inches $700 set-up + 75¢ per book


Foil & Embossing - together
Set-Up 
Cost per Book 
SMALL - Die up to 27 square inches $400 set-up + 60¢ per book
MEDIUM - Die between 27 and 54 square inches $475 set-up + 70¢ per book
LARGE - Die between 54 and 81 square inches $550 set-up + 90¢ per book
EXTRA LARGE - Die larger than 81 square inches $850 set-up + $1.30 per book

To estimate the size of YOUR die, draw an imaginary rectangle around the area to be foil stamped. Multiply WIDTH x HEIGHT. For example, a rectangle that is 5" wide and 3" tall would be 5 x 3 = 15 square inches. So if your rectangle is less than 27 square inches, it would be SMALL. If it's between 27 and 54 square inches, it would be MEDIUM.

There are some limitations to what can be foil stamped, so you should send us your artwork to make sure it can be done.

Yes, we do offer lay-flat lamination. All of our hardcover books are laminated, and for perfect bound (paperback) books, it is an option. However, please keep this in mind: all lamination will curl. "Lay-flat" simply means it curls less than standard lamination. With laminated covers, you have two different substances: a PAPER cover glued to a NYLON laminate. When they are exposed to any change in climate (temperature or humidity change), the two substances will expand and contract differently, causing the cover to curl. We use materials that are designed to minimize curl, but it can't be eliminated entirely. Our standard UV coating is embedded into the paper, and therefore curls less than the lay-flat lamination. The drawback, of course, is that it doesn't provide the protection and durability that a laminated cover does. For hardcover books (case bound), because the cover is wrapped around a cover board and glued down with end-sheets, there are no curling issues, so lay-flat lamination is standard. It provides a sturdy, durable finish.

Yes, we do. While our covers are always printed full-color, the inside pages are usually printed black-and-white. However, we also offer full-color books, as well as "combination" books (books with some black-and-white pages and some full-color pages). Pricing for all of these is available on the Cost Calculator which can be found on the "How Much?" tab.

Yes, we can print photos. Black-and-white photos on the inside, and full-color photos on the cover are FREE. If you want full-color photos on the inside, just indicate how many pages of full-color you'd like when you fill out your order.

Since your books are printed digitally, black-and-white photos on the inside pages will be printed as halftones at 106 lpi. Full-color photos are printed as continuous tones and are near photographic quality.

Yes, we can help you to format your files. We can offer you free simple instructions for reformatting your own files, or you can simply send us your files (Word documents) and we can reformat them for you. For most standard book files, the reformatting charge is $125. If you have special requirements (large files, many graphics or charts, etc.), we'll analyze your files for free and let you know up front what the reformatting cost will be.

We send a FREE PDF proof for your approval, but if you also want a PRINTED PROOF sent to you via UPS Next Day Air, respond "Yes" to Printed Proof when you place your order. You'll still get the PDF proof, but after you approve that, we'll print, bind, and ship a printed proof to you. We pay the shipping. All you pay is $40 for the proof itself. This $40 price is a special price for the first printed proof. Additional printed proofs may be more expensive, based on your book specifications.

Yes, we offer an economical alternative to the high-priced cover design you've seen elsewhere.

Our 'Economy' Create-a-Cover gives you a professional-looking book cover for a fraction of the cost. We have several templates for you to look at. Simply choose a template that you like, choose a color combination, and then send us any elements (photos, graphics, and type). We'll put them all together according to your instructions, and send you a PDF Proof. We even include one set of changes or corrections for free. At a cost of $100, it's a great alternative to getting a high-priced custom cover design elsewhere.

Our 'Custom' Cover Design (starting at $500) is a little more elaborate. One of our Graphic Designers will give you a call to discuss your book cover. We'll get your input, then create a couple of rough drafts of covers. Simply let us know what you like or dislike about each of the rough drafts. We'll make whatever changes you need, and come up with a Cover Design that's you'll be happy with.

If you have more complex requirements, we recommend that you contact a local graphic designer, since you'll probably want to meet with them in person to discuss your requirements.

Yes, we can convert your files to PDF for you, however, it's best if you do it yourself. Opening Word documents on different computers sometimes causes the formatting to shift, and the final PDF won't come out looking how you expect it to. If any formatting work is needed, there is an additional reformatting fee of $75.

In Windows, using Word 2007 or newer: Many of our clients use Microsoft Word to write their books. If you're using a recent version of Word (2007 or newer), the easiest way to create a PDF file is to click "File > Save As ..." and select "PDF File" as your file type.

In Windows, using an older version of Word or a different program: You can convert your files to PDF for FREE by using a great new converter called doPDF. Simply click here to download doPDF and select "Run" when prompted. This installs a virtual printer named &qout;doPDF" on your computer. With it, you'll be able to "File > Print ..." to create a PDF from any Windows application. Then choose "doPDF" as your printer. The first time you use doPDF, hit the 'Preferences' button and change 'Graphic Resolution' to 600 dpi (near the bottom right of the window.)Hit 'OK' and your Preferences are all set. Hit 'Print', make sure 'Embed fonts' is turned ON, and it will create a PDF.

From a Mac: PDF conversion is built right into your system. To create a PDF file on a Mac, simply open your file, select "File > Print", then click the "PDF" button at the bottom left and choose "Save as PDF ...".

Be sure to check your PDF file CAREFULLY before sending it to us for printing. Any errors on your PDF will show up on all of your books. If you have questions, call us for help, or just send us your Word files and we'll convert them for you for a $50 charge.

We've got a complete prepress department, staffed with qualified graphic designers. Depending on the type of files that you send us, we can take care of most corrections or deletions. Any corrections or modifications may incur extra fees -- just let us know what you have in mind and we can provide you with a quote for the work ahead of time.

Yes, we can print index tabs in your books. We recommend that you only use tabs for spiral bound books, but we MAY be able to put them into perfect bound and hardcover books as well. For coil bound books:

B/W Tabs:

1-sided ... $50 base + 30¢ per tab per book
2-sided ... $50 base + 40¢ per tab per book

Full Color Tabs:

1-sided ... $100 base + 50¢ per tab per book
2-sided ... $100 base + 70¢ per tab per book


For Perfect Bound and Hard Cover books, tabs are a little trickier. We recommend that you call or email us the information, and we'll let you know if it can be done, and what the cost would be. If you have questions, just call or email us. We'll be happy to help.

Yes, we now offer Foil Stamping, Blind Embossing, and Foil Embossing. Each job is unique, so we'll need to get more detailed information before we can give you pricing. Also, keep in mind that adding any of these will add 3-4 days to the turn-around time of your order.

We don't require you to use high resolution graphics, but we do recommend it. We want you to be happy with your final product, so we send you a warning when we find something that may not print perfectly. We won't hold up your order and will continue working on your files as they are unless we hear from you. When previewing your PDF files, zoom in to about 200% of the original size. This will give you an idea of how images or text may look when printed. If you’re OK with the way everything looks at 200%, chances are you’ll be happy with the way it prints. (Of course, the only way to be sure you're happy with the quality is to order a printed proof with your order—we highly recommend this).

Sometimes graphics lose quality when you’re creating a PDF file, so the first thing you'll want to double check is the quality of your graphics in your original document. If everything looks good in your original document, take a look at how you are saving the file.

The settings to avoid losing quality vary depending on which program you’re using to create your book. As long as your image was high quality to begin with, you’ll be able to create a PDF without losing any quality; it may just take some experimenting to get the options right. A good rule of thumb when saving as a PDF is to check every “options” or “properties” window that appears when saving to make sure nothing is compressing the file. (“Print” quality is always better than “Web” quality and a larger file is usually better than a smaller file)!

PLEASE NOTE: Even though the program allows you to do it, going into Photoshop and simply changing the dpi of an existing image to 300 will NOT improve the way your image prints. We wish it were that easy!

Your settings may not look exactly the same as the examples shown here, but they should be similar. Use the links below for instructions for specific programs.

Remember…

…these settings will only help you from LOSING image quality—they can’t give you quality that wasn’t there to begin with. If you need help determining the resolution of your original images (or improving it), you can find more information about that below.

You can find out the resolution of your image by opening it in a photo editing program such as Adobe Photoshop or by using the methods below:

Finding the dimensions on a Windows Computer

You can also find the dimensions and resolution on a Windows computer by right-clicking on the file and selecting "Properties." The properties window will open. Select the "Details" tab along the top of the window.

Windows Image Properties

This is where you’ll find all of the info you’ll need about the image, including the dimensions and the dpi.

Windows Image Details

Finding the dimensions on a Mac

On a Mac, you can right-click on the file and select Get Info.

Get Info

A window will pop up with information about the image including its dimensions in pixels.

Mac File Properties

Image Resolution: Inches, Pixels, and dpi

When we talk about resolution, we're referring to the dots per inch (dpi) of the graphics. A higher dpi means a higher quality image—so if something is low resolution, that means it has a low dpi and may print blurry. Especially if you’re searching online for an image, it’s important to check the dpi or the dimensions in pixels if they are noted. To get the best quality, you’ll want to make sure the images you use are at least 300 dpi at the finished size. See the FAQs above for instructions on how to determine the dimensions of an image. If you're scanning images, make sure your scanner is set to a resolution of at least 300 dpi and that you're not enlarging the image too much from its original size.

If you can’t determine the dpi or can’t get a version of the image that is at least 300 dpi, you’re not out of options. While we recommend 300 dpi, it’s often true that 200 dpi is good enough.

Making Sense of the Numbers

Here’s an example. Let's say we have an image that is 240 pixels wide x 160 pixels tall. The width in pixels divided by our desired resolution (dpi) will give us the maximum width in inches before the image becomes low resolution.

(Pixels ÷ Desired dpi = Maximum Size in Inches).

So, we take the 240 pixel width and divide this by the 200 dpi quality we’d like, which gives us 1.2 inches (240 ÷ 200 = 1.2). This means the photo will be blurry or low resolution if it’s larger than 1.2 inches. But at 1.2 inches wide, it’s acceptable quality and ready to print.

240 Pixel Image

We know what you’re thinking: 1.2 inches is way too small. If you need an image to be a specific size, you can find out what resolution it will be at that size by using a formula similar to the one above. The width in pixels divided by the desired width in inches will give you the resolution at that size.

(Pixels ÷ Inches= dpi).

So, let's say we want this image to be 4 inches wide to be centered on the front cover of our book. We take the 240 pixel width and divide this by the 4 inch width we want, which gives us a dpi of only 60 (240 ÷ 4 = 60). This means if we're enlarging the image to 4 inches it will look pretty blurry when printed (and even looks blurry on screen):

Enlarged 240 Pixel Image

If you have access to a larger or higher resolution version of an image, you have a better chance of getting it to look the way you want. Unfortunately there’s just not a way to improve the quality of an image if it’s low resolution to begin with. Luckily, our photographer was able to send us a version of the same image that is 800 x 533 pixels.

800 pixels divided by 200 dpi (the lowest dpi we want before we risk losing quality) = 4 inches (800 ÷ 200 = 4). This means we can make the image 4 inches wide or smaller and it will be good quality when printed, though not perfect.

We're much happier with the way this image looks, even though it’s still not the recommended 300 dpi.

800 Pixel Image

If we wanted to ensure beyond all doubt that the picture would print perfectly without having to re-size it, we’d need to find a version of the image that was at least 1200 pixels wide. (If you’re catching on, you’ll know that we found this by multiplying our desired 4 inch width by our desired 300 dpi resolution (4 x 300 = 1200)).

Here are those formulas again:

Pixels ÷ dpi = Maximum Size in Inches

Pixels ÷ Inches = dpi

Inches x dpi = Width in Pixels Needed

Crunching the numbers and trying to figure out image resolution can be a real headache, but it’s an important step in getting your book to look the way you want. High resolution images make your book look much more professional, and it’s worth the extra time and effort to get a great looking final product!

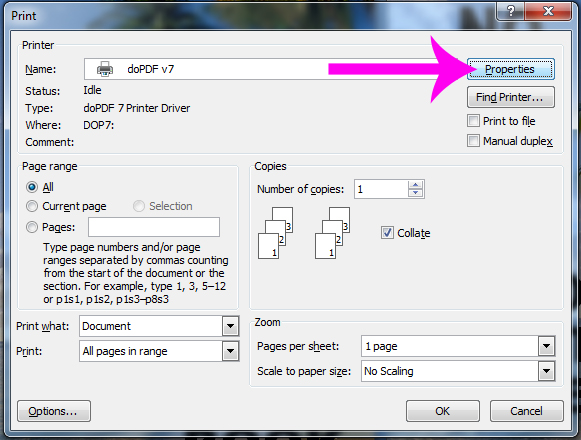
We recommend using the free PDF converter called "doPDF" (available here) if you are using a Windows computer. Once you have the converter installed on your computer, go to File > Print. Make sure you choose "doPDF v7" as your printer, and then click on the "Properties" button.

Print Options

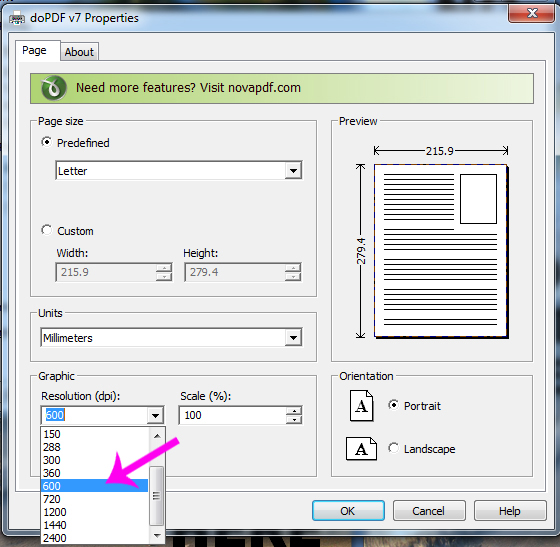
Another window will open up and in the bottom left corner you will see a drop-down menu labeled "Graphic resolution (dpi)." Change the resolution to 600 dpi and hit "Ok." Then, press the "Print" button.

Properties Window

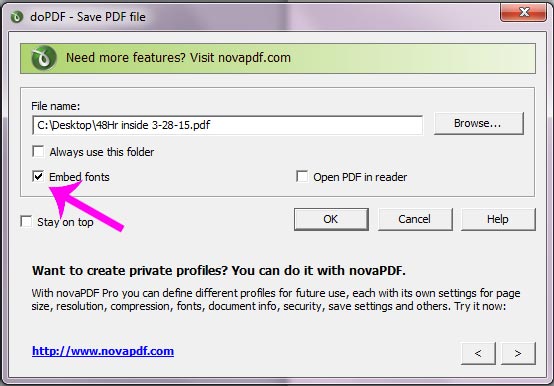
Very Important >> In the next window, be sure the box for "Embed fonts" is checked. You'll also want to pay attention to where you are saving this PDF file. It's usually easiest to save it to the Desktop, and give it a unique name like "48Hr inside" with today's date. This way, it won't get confused with previous versions.

Embed Fonts


If you decide not to use doPDF, you may be able to select "File > Save as PDF." If so, you should see the option here:

Optimize for Printing

Be sure to select "Optimize for Standard Printing and Publishing" and make sure that "Minimum size" is NOT selected.

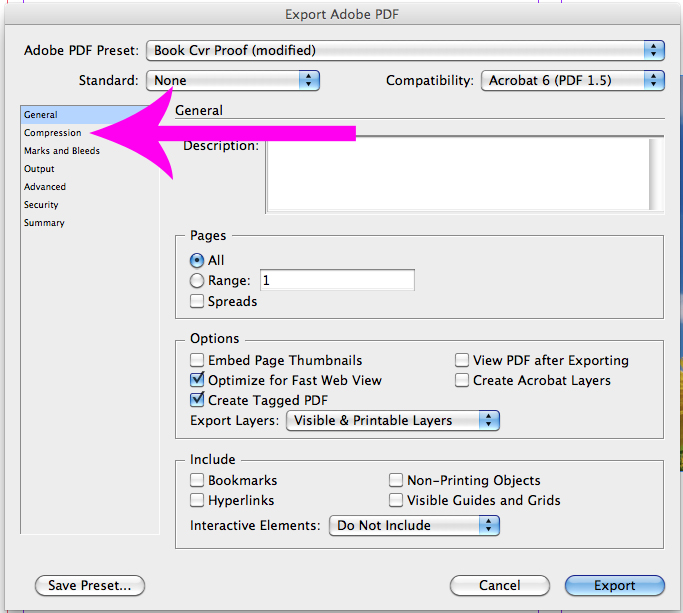
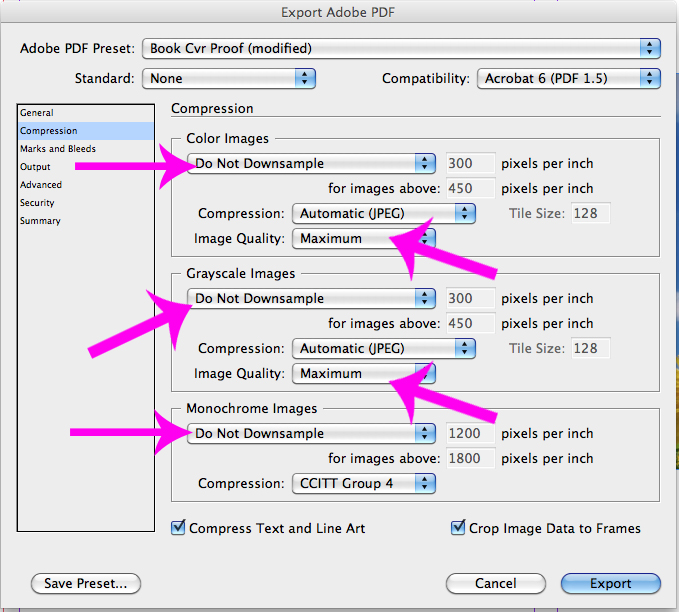
Go to File > Export and choose "Adobe PDF (Print)."  Choose a location on your computer to save the file and click "save." Another window should pop up that looks like this:

Export Adobe PDF

You can choose a preset* at the top in the drop-down menu if you'd like (usually "Press Quality" is good enough). If you'd like to adjust the settings on your own, go to the "Compression" options on the left-hand side, make sure all elements are set to "Do not downsample" and "Maximum" quality. Then, click "Export."

Export Adobe PDF Compression Options

*If you choose a preset, be sure to check all of the settings to make sure they are correct for your book. For example, if you have bleeds built in to your file, go under "Marks and Bleeds" on the left-hand side and make sure "Use Document Bleed Settings" is checked.

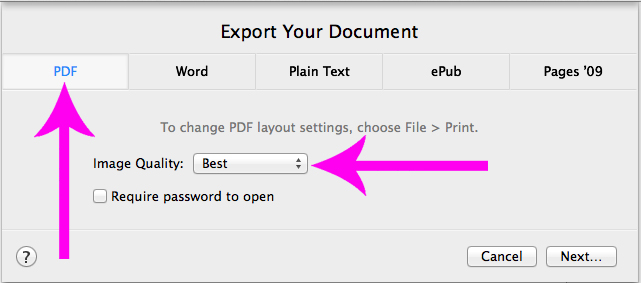
Go to File > Export to > PDF. A window will pop up with some options. Make sure "PDF" is selected in the top left corner, and under "Image Quality" use the drop-down menu to make sure "Best" is selected.

Export From Pages

Then click "Next," choose a location on your computer to save the file, and click "Export."

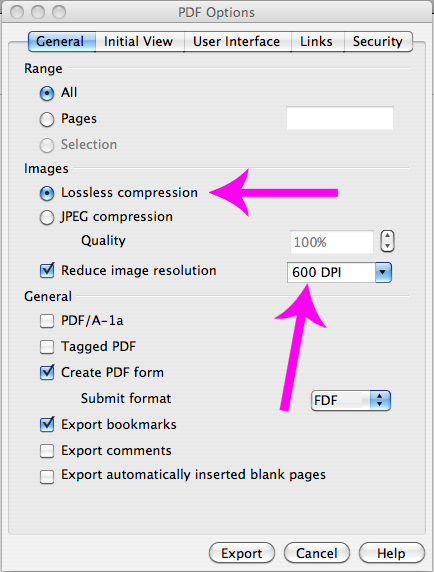
Under the "File" menu at the top, choose “export as PDF” and then change the resolution to 600. Make sure to choose “Lossless compression” or JPEG quality “100%.” Then, click "Export," choose a location on your computer to save the file, and click "Save."

Export from Open Office

There are settings within Acrobat Distiller that determine how much to "downsample" your file to a lower resolution. While handy for web graphics, this can be horrible for printed material. Either use one of Adobe's pre-set settings ("Print" or "Press" work fine), or change the settings yourself within Distiller.

Go to the "Settings" menu at the top and select "Edit Adobe PDF settings." A window will pop up. Under the "General" tab, make sure the resolution is set to at least 600 dpi.

Distiller General Settings

Then, click on the "Images" tab at the top of this same window and check all of the settings. Make sure the "downsample" is set to no lower than 300 dpi for color and grayscale images and no lower than 600 dpi for monochrome images (line art). Then hit "OK."

Distiller Image Settings

Select the next larger size from our list of book sizes, then write the ACTUAL book size in the COMMENTS section of the order form. For example, a 5"x7" book would be priced like a 5.5" x 8.5" book, and a 7"x10" book would be priced like an 8.5"x11" book.

In general, the "per book" price drops as you order more books. But, because we give you 25 free books, sometimes it can actually go a little higher.
Here's an example:
  • 100 + 25 free = $5.72 each
  • 200 + 25 free = $5.82 each
  • 400 + 25 free = $5.88 each

Now, why would the "per book" price be HIGHER for larger quantities? Here's why:

The 25 FREE books are very significant on the order of 100 books, where they account for 20% of the order (25 divided by 125). They are a little less significant on the order of 200 books, where they only account for 11% of the order (25 divided by 225). And they are even less so on the order of 400 books, where they account for about 6% of the order (25 divided by 425). So it's not that the higher quantities are more expensive, it's just that (in some cases) the small quantities are artificially low because of the 25 free books. The more expensive a book is (very thick books, lots of color pages, or case bound books), the more likely this phenomenon will be. For example, you may not see it happen with a 60-page book, but you will with a 600-page book.

"Gaming the System" is OK with us: Suppose you want 350 copies of your book. By playing around with our Cost Calculator, you may find that you can save money by placing two separate orders, each for 150 + 25 free, instead of one order for 325 + 25 free. And that's just fine with us ... we commend you for doing the math! Just let us know that you are intentionally placing two orders so that we don't think it's an accidental duplication of orders. We're happy to honor the lower price.

There's a big difference between "pages" and "sheets." The front and back of a SHEET count as two PAGES. If you've got 60 sheets 2-sided, that equals 120 pages, so make sure you enter "120." Just about all computer programs will tell you how many pages are in your file, but if we are going to reformat your files, the final number of pages in your book may change. In that case, just enter your best guess at the number of pages and we'll let you know exactly how many there are after it's been reformatted.

Each order we receive is assigned a graphic designer who performs any necessary prepress work. Even if your files are "print-ready," our techs do a number of things to make sure everything will print correctly. We'll check to make sure fonts are embedded, page size is correct, margins aren't too narrow, bleed is set up if necessary, images are high resolution, the cover will fit, and more!

We sometimes make the following adjustments to your file(s):
(a) reduce or enlarge your file to fit the page size you selected,
(b) add or remove blank pages where we think it is helpful,
(c) adjust your margins,
(d) add or change your page numbering or
e) move elements on your cover art slightly.

We will NOT perform editing work such as spelling, grammar, or typo corrections.

Please review your PDF proofs carefully. If you're not sure about something, send us a note or give us a call!

When you are finished proofreading, log into your 48HrBooks account and either “Approve” or “Reject” your proofs. Even though the cover and inside pages are separate files, you’ll only approve if BOTH proofs look correct. Please remember, once you sign off, your books go into print immediately. You won’t be able to make any more changes.

To make corrections or send new files, REJECT your proofs - you won't hurt our feelings! We want your books to be perfect. After rejecting your proof, all corrections must be submitted in writing and sent in a single email or order note. If they are OUR mistakes, we will correct them for free. If they are YOUR mistakes, we may be able to make minor corrections and save you the $50 cost of sending revised files. If we can’t, we’ll tell you what we need.

Please do not directly edit the proof files we send you - we won't be able to print them!

The best way to keep your costs low is to proofread carefully at every step. Your costs start to increase if we have to go back and forth with multiple revisions of your files. Try to give us trouble-free "ready-to-print" files from the beginning. (If you've never formatted a book before, we do offer formatting services.) Next, make absolutely sure that the PDF proof that you approve is correct. We give you this proof so that you have an opportunity to find errors, yours and ours, BEFORE the books are printed. If there are errors that go undetected in the proofreading, we cannot reprint your books for free. The best we'll be able to do is make the corrections to your files so they are right for the next printing.

When we send you PDF proofs to review, we set them up in 2-page spreads to simulate how the pages will lay when you're actually holding the book in your hands. Because of this, the page size of the proof will be TWICE as wide as your final trim size. For example, if your book size is 5.5x8.5 inches, the PDF proof of your inside pages will be 11x8.5 inches. If your book is 6x9 inches, your proof will be 12x9 inches, and so on. To get the size of the PDF to show up in Adobe Acrobat or Adobe Reader (the programs you should be using to review your proofs), follow these steps: 1) Go to Preferences 2) Click on "General" 3) In the window that pops up, click on "Page Display" on the left-hand side. 4) Find the check box that says "Always show document page size" (about half way down) and make sure it IS checked* 5) Click "OK" and you'll see the page size displayed in the lower left-hand corner of your file when it's open. *While you're adjusting your display preferences, make sure you have Overprint Preview (the option below the Page Size checkbox) set to ALWAYS. This will show a more accurate display of how things will print.
A solid line indicates where your book cover will fold around the spine. These guide lines will NOT print. They are simply to show you where your text and artwork will be printed to ensure they are centered and are what you intended. If your book is hard cover: A thin dotted line indicates where the crease is on your cover. If you have a dust jacket: A thick dotted line indicates where your dust jacket flaps will fold.

"Rush" and "SuperRush" production options are available.

For perfect bound books: "Standard" service means we ship your books 2 business days after your artwork approval. "Rush" means we ship your books one business day after your artwork approval. "SuperRush" means we ship your books the same day, as long as your artwork is approved before noon EST, and you'll need to confirm that SuperRush is still available for that day.

For coil bound and hardcover books: add 3 days to the turnaround, making our "Standard" service a 5-day turnaround, "Rush" a 4-day turnaround, and "SuperRush" a 3-day turnaround.

You'll be able to select expedited UPS shipping (Next Day Air, 2nd Day Air, etc.) when you place your order.

Yes, we do this all the time! Even if you need your books tomorrow, we can probably get it done for you. Just select "SuperRush" and Next Day Air, then get us the files early enough that you'll be able to sign off on your PDF Proof before noon EST. But if you're choosing "SuperRush", be sure to call us to confirm that we've got production time available that day.

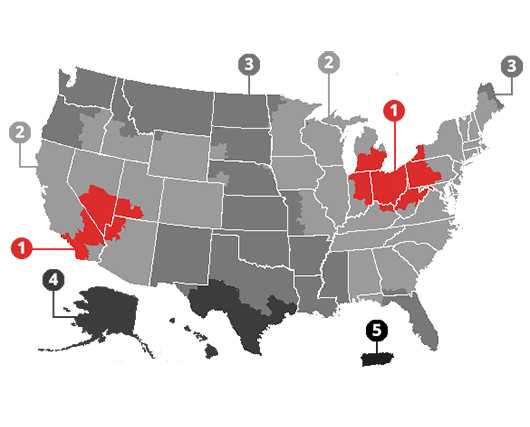
In addition to Rush and SuperRush production times, we can also expedite your shipping. Check out the UPS shipping map below to see how long UPS Ground will take to get to you. If you need your books faster than that, you may want to select Next Day Air, 2nd Day Air, or 3 Day Select as your shipping method. However, it's usually less expensive to upgrade the PRODUCTION time (Rush or SuperRush) than to upgrade the SHIPPING. We can help make sure that your books get delivered on time. Just give us a call, but be sure to do it BEFORE you give final approval of your artwork.

Yes, we can split ship your order. For instance, suppose you order 200 books, but want 50 to go to New York and the rest to go to California. No problem. Just let us know exactly how many go to each address, and we'll take care of the rest. Since you'll have multiple "ship to" addresses, your shipping cost may be a little higher.

Yes, blind shipping is available, and we don't charge extra for it. Blind shipments are sent in plain brown boxes, without our name appearing anywhere. Your company is listed as the shipper.

We ONLY ship to USA and Canada. We like to follow through on all of our orders, and a shipment to other countries can be difficult to track, expensive to ship, and hard to guarantee by a certain date. If you need your books shipped to a different country, we recommend that you coordinate a pickup of your books at our offices with your preferred carrier (UPS, FedEx, DHL, Post Office, etc.). We'll print, bind, package, and have your books ready for pickup.

Placing your order is the same - no special instructions. However, when shipping to Canada, there are two things to keep in mind:
  1. Our shipping charges cover the shipping cost, but not the duties and taxes. Any shipments to Canada require duties and taxes to be paid by the receiver at the time of delivery. The exact amount due will be determined by Revenue Canada.
  2. If your package is held up in Customs, it could be delayed. Unfortunately, neither 48HrBooks nor UPS can speed things up if your package is being held in Customs.
We ship your books using UPS. While we love UPS and almost never run into shipping issues, delays in shipping can occur (especially during high-volume shipping times, such as December). Unfortunately, there's not a lot we can do once the package leaves our building, so when a delay does occur we recommend that you contact UPS directly. Your tracking number should be listed in your exception notice but is also conveniently listed on your order details page. To find it, log in to your account and click on the red "details" button to the right of your book title. Your tracking number will be listed in the left-hand column of the order details page. UPS likely won't be able to speed up the package if it's delayed, but they can help you update the delivery to a different address if needed, or have the package held at a UPS hub so you can pick it up. You can use UPS’s “My Choice” feature to help streamline all of your incoming shipments. Membership is FREE, and you'll receive delivery alerts, and be able to authorize delivery without a signature, Hold for Will Call, Reschedule or Change delivery. Get complete information at www.ups.com/mychoice or you can call UPS at 800-PICK-UPS (800-742-5877). Be sure to have your tracking number handy!

To order reprints of your book, simply log into your 48HrBook account. Once logged in, you will see a list of your past book orders. Locate the book you would like reprinted and click the "Reorder" button. You'll then be asked whether you would like an "Exact Reprint" or a "Reprint with Changes to Artwork." Click the corresponding link and you will be directed to the appropriate order form. "Reprint with Changes to Artwork" refers to ANY changes that need to be made to your previous order - the inside pages, the book cover, or the finishes of the book. We may be able to make the changes for you, or you may need to submit a new file. Note your corrections in the "comments" section of your order, send us an email with a list of changes, or call us anytime if you're not sure how to proceed!

We'll provide you with two different formats: a MOBI file (that works on Amazon's Kindle devices), and an ePub file (that works on iPad, Nook, iPhone, and virtually all other eReader devices).
Word files are the best, but we also accept other word processor files, InDesign, and PDF.
Usually 3-4 business days (Monday thru Friday). All conversions are done manually by a qualified technician. More complex conversions may take a little longer. If you've got a deadline that you have to meet, let us know.
We hand-code all of the files (using HTML) into .epub and .mobi formats. We try to match exactly what’s in the existing document as closely as possible. We do not do any design or add to the existing formatting. When the conversion is complete, we send the files back to you to distribute as you wish.
No, but the file we provide you will be validated and ‘Upload Ready’ for any of the major online vendors. We can not upload the file to eBook vendors for you.
We recommend selling your eBook through as many eBook vendors as possible, including Apple’s iBookstore, Barnes & Noble’s Nook marketplace, and through Amazon. We can provide limited information on how to do this, but it is best to contact those specific vendors to discuss their process and requirements. Here are links to those sites to get you started:
- Barnes & Noble: www.nookpress.com
- Apple/iBooks: www.itunesconnect.apple.com
- Amazon/Kindle Publishing: www.amazonkdp.com
While we do not send a specific “proof” file like we do with printed books, we don’t consider the conversion complete unless you’re 100% happy. Please let us know within 20 business days (4 weeks) if there are mistakes in the conversion or if you have questions or concerns about how your eBook looks.
We’re happy to fix any of our mistakes free of charge as long as we’re notified within this time period. If you find other edits that you’d like to make (typo corrections, text edits, or additions), please send us a detailed list of edits corresponding to page numbers in the original file & we can make the edits for an hourly rate of $75/hour.
If you send us a cover, we will include it on the eBook. This will show up on your device’s “bookshelf” with any other eBooks that you have on your device. If you want to include the back cover, we can add it as the last page in your eBook. Some eBook vendors require that you also upload the cover separately from your eBook to be included on their marketplace. We will provide you a correctly sized JPEG of your cover for this purpose if you need it.
We do not include any DRM (digital rights management), password-protection, or enrypting of the file. This means that the files can be copied and shared as many times as you'd like. If you do want protection included in the file, this is something that can be added when you put your book up for sale on Amazon and other sites. You'll need to check with the specific site for details.
We hand-code all of our eBooks and review your completed eBook on our eReader devices before sending you the files. We also run the files through a validation process that ensures they will be accepted by the major eBook vendors without any problems. Please let us know within 20 business days if there are mistakes in the conversion or if you have questions or concerns about how your eBook looks. We’re happy to fix any of our mistakes free of charge as long as we’re notified within this time period.
No. All proofreading and editing should be finalized BEFORE you send us your files to convert. We do not recommend editing .epub files on your own. If necessary, we can make edits for you at a rate of $75/hour. We can only guarantee that the files will be valid and that they will display properly if you do not edit them yourself. You are welcome to make changes to the files if you find a program on your own that allows it, but then the files are out of our hands permanently.
Most ePub sellers require an ISBN. Technically, Amazon says you don't have to have an ISBN, but it's probably still a good idea to have one for the MOBI version as well. Each format of your book requires its own ISBN number. So if you've got some perfect bound books, some hard cover books, an ePub version and a MOBI version, you'll need 4 ISBNs total.
We can make an eBook from scanned material, but it will not read like a traditional eBook. You will not be able to re-size the text or search within the text on the eReader. Basically, the scanned pages will appear as though they are images of each page. We don’t recommend that you create eBooks from scanned materials, but we can do it if you’d like!
You will not be able to open the files that we send you on your computer. These files are formatted specifically for eReader devices, not computers. If you absolutely cannot access an eReader device (Kindle, Nook, iPad, tablet) to view your files, there are two free preview programs that can be downloaded to preview your files, but they will not be very accurate representations of how your eBook will look on an eReader.
- For .epub files - Adobe Digital Editions
- For .mobi files - Kindle Previewer
If your book needs to have a fixed layout (so that images and text stay exactly in place -- usually relevant for art books or children’s books), you will need to send us your file to determine if we can create an ebook file for you. Fixed layout files are not available at this time.
While our conversion team takes extra time to replicate the look and feel of your original file, the layout of your book may not be exactly the same. eBooks have certain limitations that other files do not.
- Fonts will change based on the reader’s personal choice
- Text will flow differently depending on the size of the device and the font and font size that the reader has chosen. (For example, on an iPhone you may see 2 paragraphs on the page, but if you’re reading the same file on an iPad, you may see 5 paragraphs on the page since the device is larger). The layout is not static like it is in a printed book. (If you need the layout to be static, please send us your file and we can provide a quote for a fixed layout .epub file).
- Images will be centered between paragraphs instead of showing up with text wrapping around them.
- Background images or colors will not show up.
- If you have call outs or text boxes in your book separate from the main text, we recommend removing them prior to having us convert the file; otherwise they will be inserted as images (and centered between paragraphs).
- We do not include any index in the file. An index refers in a printed book refers to specific page numbers. In an eBook, the page numbers vary based on device and font selection. We do include a linked table of contents, which links to each chapter.
Our conversion pricing is based on a few factors: # of pages, # of footnotes or endnotes, and # of pictures, graphics or images. If your file falls into our Economy or Standard conversion levels, the pricing is:
Economy eBook Conversions ... $200
In order to be considered Economy Conversion, your book must be:
- less than 200 pages (when set in 12 point Times in Microsoft Word)
- does not have foot notes or end notes
- contains 10 or less pictures, graphics, and charts
If any of these three conditions are not met, then your book may be Standard Conversions.
Standard eBook Conversions ... $350
In order to be considered “Standard” eBook Conversions, your book must be:
- less than 400 pages (when set in 12 point Times in Microsoft Word)
- less than 100 foot notes or end notes
- less than 50 pictures, graphics, and charts
If any of these three conditions do NOT apply, then your book will be a “Custom” Conversion. If you’re not sure which your file qualifies as, please send us your file and we can provide a quote for you.
Some companies may offer lower-priced eBook conversion, BUT they require that your document first be formatted perfectly using their specific requirements. They simply run your file through an automated process and spit it out. This takes a lot of extra work up front for you and results in a final product that may not match your original formatting and may contain errors. We hand-code every part of our eBook files, compare them to your original document along the way, and personally review the eBooks on actual eReader devices before sending the converted files to you.

If you want your cover artwork to extend all the way to the edge of the cover (so it "bleeds" off the cover), you'll need to extend that artwork BEYOND the edge of the cover at least 1/8". Some programs will create a bleed for you, but if you're not sure how to do it, simply create a page size that is 1/4" wider (1/8" added to the right, and 1/8" added to the left), and 1/4" taller (1/8" added to the top, and 1/8" added to the bottom), and make sure you keep any TYPE at least 3/8" away from the edges for your cover files, and at least 3/4" away from the edges for inside pages.

Since all of our books are custom orders, we do not accept returns unless there are manufacturing defects or damages in shipping. On the rare occasion that there is a defect in the manufacturing process or damage in shipping, please call or email us immediately and let us know what's wrong. We'll reprint the affected books and send them out to you at no additional charge. All claims of defects in manufacturing or damages in shipping must be made within 30 days of receipt of your order, so please, open your shipment and examine your books when they arrive.

Our terms involve a $100 deposit before we start working on your files, and payment in full before we start printing. We accept Paypal and all major credit cards. We require a $100 deposit for all orders, after which we will begin working on your files and creating your PDF proof. You can make additional payments by logging onto your account, selecting your current order, and clicking the "Add Payment" button on the right side. All orders must be paid in full before we can begin to print your books. If you choose to pay by check, simply select "Other" as form of payment when you place your order. Then make your check payable to "48 Hr Books" and send it to:

48HrBooks
2249 14th St. SW
Akron, OH 44314

Please note that paying by check (including Paypal's E-Check) will delay your order by several days, since we wait for your check to clear before we begin printing. If you've got a PayPal account, why not use their "Bill Me Later" feature?

Click here for a sampling of the hundreds of complimentary notes we get from our satisfied customers.

Ready to print?

Place an Order